 ownloads Documentation Centre!
Monitoring Options and Checking the Download Area -Jul 2023
Introduction
This article deals with both using the the Monitoring system and setting up the Monitoring tab in  .
.
The monitoring possibilities available in jDownloads allow to run a precheck, and also to monitor for either new Categories, including new subcategories, or new Downloads or both.
The defalt is categories and downloads.
This is particularly useful when uploading a large number of folders and files in order to make them into jDownloads Categories, sub-catecories and Downloads.
The folders and files would be uploaded to the 'jdownloads' directory in the Joomla root with say an FTP utility such as FileZilla, or by using your c-panel file manager or similar.
It is the 'jDownloads Administrator Monitoring' module that provides the  capability. The default module location 'jdcpanel' displays the module in the jDownloads control panel. If you select the module location as 'cpanel' then it will appear in the Joomla! control panel.
Monitoring Examples
The following examples assume that:
(1) some folders and files have been uploaded into the 'jdownloads' root directory;
(2) the default setup for the Check Download Area is a 'test run'.
An efficient method of creating these into Categories and Downloads is to use the button located in the
  on the right hand side of the jDownloads Control Panel.
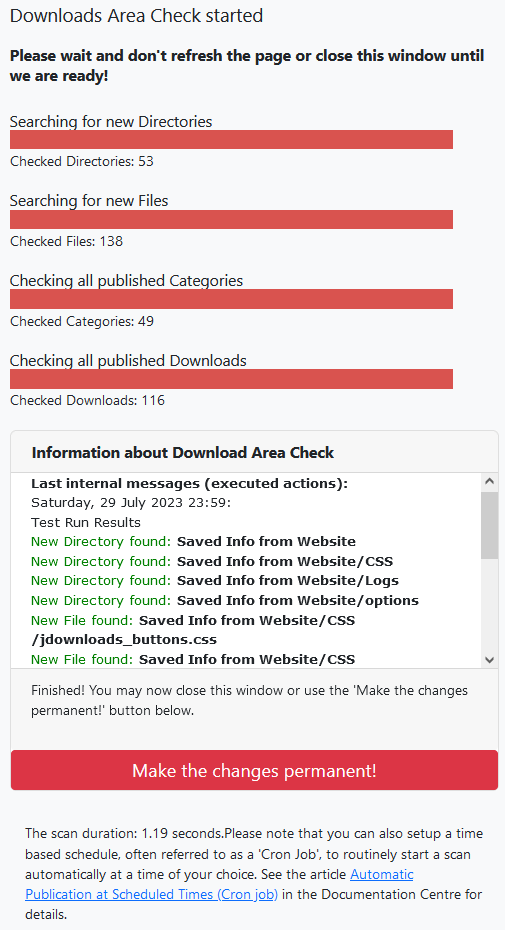
The first image on the right is the result of the 'check run' to identify if the are any new or missing items.
As there were no faults found click on the button to procede.
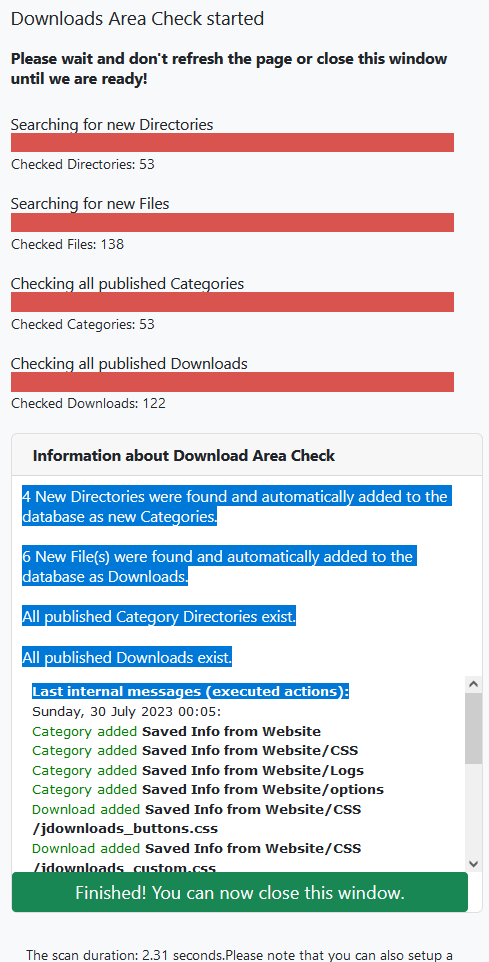
jDownloads reruns the monitoring but this time actually makes the database entries.
The image on the far right are the results of creating the new categories and Downloads. Click on the button to exit.
(1) some folders and files have been uploaded into the 'jdownloads' root directory;
(2) the default setup for the Check Download Area is a 'test run'.
An efficient method of creating these into Categories and Downloads is to use the
The first image on the right is the result of the 'check run' to identify if the are any new or missing items.
As there were no faults found click on the
jDownloads reruns the monitoring but this time actually makes the database entries.
The image on the far right are the results of creating the new categories and Downloads. Click on the
In this example errors were generated by deleting a file and a folder but not relevant database enteries.
After clicking on Make as shown in the first image then jDownloads unpublishes the relevant items to make the situation 'safe' for front end users.
Note the contents in the report sothe problem may be recovered.
To exit again click on
Adding directories and files to create Categories and Downloads respectively involves making a significant number of database entries. If there are only a modest number of existing Categories and Downloads, say around 1000 or less, and say just a couple of hundred new items one would do a Full Scan. The options 'Monitor All Folders' and 'Monitor all FileTypes' determine, respectively, which folders and files are included in the search. The default setting for these options are All Folders and All File Types.
But if there are many Categories or many Downloads already in jDownloads or you are adding a large number of directories and files then dependant upon your server the process may run out of the current PHP execution time limit. Selecting in turn the options 'Search only for new directories' and 'Search only for new files' reduces the possibilty of exceeding the execution time limit.
But if there are many Categories or many Downloads already in jDownloads or you are adding a large number of directories and files then dependant upon your server the process may run out of the current PHP execution time limit. Selecting in turn the options 'Search only for new directories' and 'Search only for new files' reduces the possibilty of exceeding the execution time limit.
Monitoring Types
There are five monitoring choices as noted below:
- Full scan
- Search only for new Directories
- Search only for new Files
- Check only for the existence of Categories
- Check only for the existence of Downloads
Scanning for new items
The first three options support the choice of a test run first. In all cases, especially when there area large number of folders and files to be converteted into Categories and Downloads, see the notes below about restricting the search region and the setting of options 'Monitor all File Types' and 'Monitor All Folders'.
Full Scan does what it says and looks for new directories and new files in the selected part of the Download Area. If it is not a test run then jDownloads will make the relevant database entries.
Search for New Directories will only look for new directories in the Download Area. Again if it is not a test run then jDownloads will make the relevant database entries in the Category table.
Search for New Files will only look for new files, which must be in an existing category in the Download Area. Similarly if it is not a test run then jDownloads will make the relevant database entries in the Downloads table. As with the Categories Search.
In a situation where you are dealing with a large number of entries then obviously do a Search only for new directories and, if successful, follow by Search only for new files.
The Monitoring Tab options may be considered in three sections.
1. Those options relating to the use of the button on the jDownloads Control Panel.
2. Options providing default descriptions for Categories and Downloads.
3. Other options.
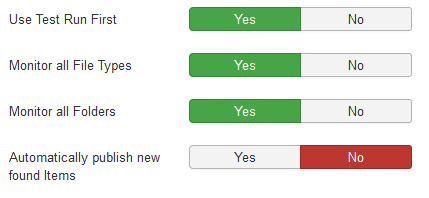
The first option in this section is 'Use Test Run'. The default value is Yes.
This setting is particularly useful as it allows checking of errors and how many new files and directories have already been created as Downloads and Categories, and how many of each type are to be added.
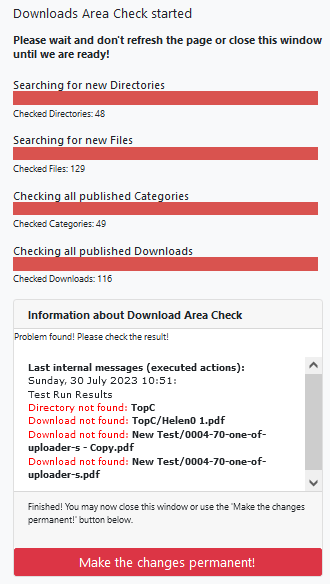
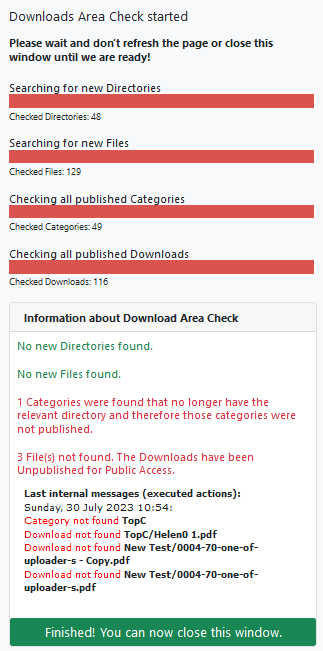
In this example a file was deleted manually. So when actioning the 'Check Downloads Area' it gives a 'Problem Found! Please check the result!' message.
In this case the Download was invalid so the message below appeared.
Download not found: pdf files-2/TestUpload.pdf
It allows any errors to be determined before committing to make the folders and files into Categories and Downloads.
If 'Use Test Run' is set to No then Categories and Downloads will be created without the precheck.
There are several available extra options for categories.
Most of the options use pull down lists to select the available possibilities.
That is, apart from the description, you cannot specify something that has not been setup previously.
A special mention is made for Tags. Specifically you cannot type in a new Tag name, you can only use existing tags.
Note that these settings will apply to the next monitoring scan that actually creates new categories. This could be a 'cron' automonitoring scan.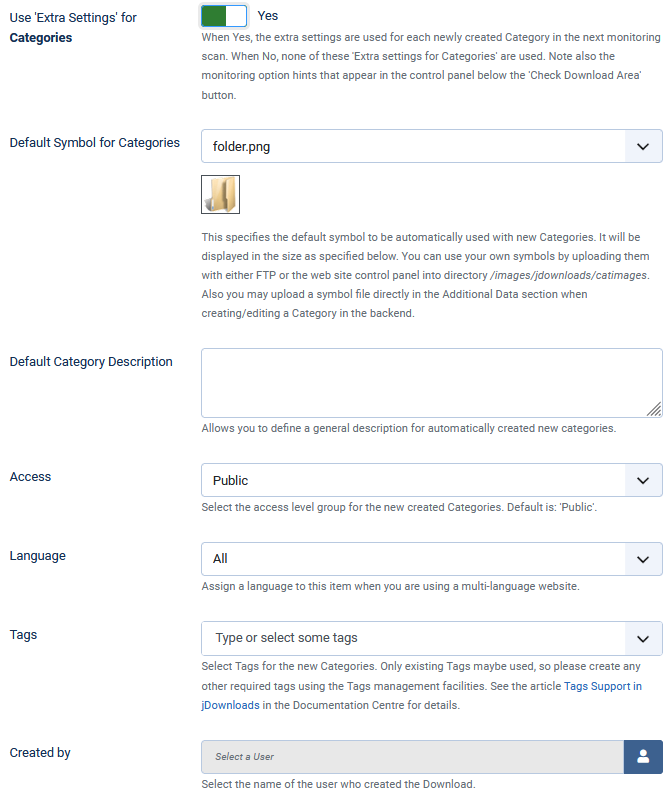
An example from the backend showing an existing category (yellow folder) and two categories (blue folders)added using the Extra Categories option.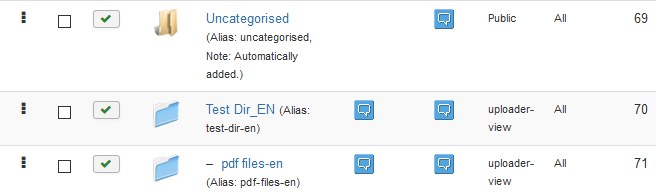
Example from the frontend of some new downloads added using the Extra Downloads option.
The Description option was set to 'New Download added automatically'. So it appears in both Downloads.
Colin Mercer February 2019, Updated August 2020, May 2023,July 2023
Full Scan does what it says and looks for new directories and new files in the selected part of the Download Area. If it is not a test run then jDownloads will make the relevant database entries.
Search for New Directories will only look for new directories in the Download Area. Again if it is not a test run then jDownloads will make the relevant database entries in the Category table.
Search for New Files will only look for new files, which must be in an existing category in the Download Area. Similarly if it is not a test run then jDownloads will make the relevant database entries in the Downloads table. As with the Categories Search.
In a situation where you are dealing with a large number of entries then obviously do a Search only for new directories and, if successful, follow by Search only for new files.
Checking existence
The other two options, 'Check only for the existence of Categories' and 'Check only for the existence of Downloads', check the compatibility of the database entries for Categories and Downloads against the actual directories and files that exist on the server.
As an example a 'Check only for the existence of Categories' option was run. If all is well then a message like the one on the right is shown.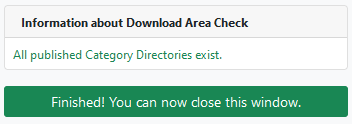
To simulate a fault, the name of one of the directories was changed and the Check only for the existence of Categories option was run again as a 'Test Run'.
This time the message block showed the 'View Details' pulldown. After clicking on View Details it showed that there was a missing directory. If following the test Run you decide to make the change Permanent then the category will be unpublished.
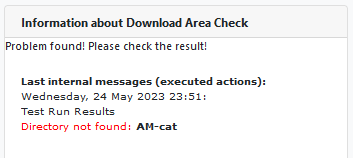
This time the message block showed the 'View Details' pulldown. After clicking on View Details it showed that there was a missing directory. If following the test Run you decide to make the change Permanent then the category will be unpublished.
It is recommended that if the 'View Details' link appears then you should use it to check the report.
Adding many items
Adding directories and files to create Categories and Downloads respectively involves making a significant number of database entries. If there are only a modest number of existing Categories and Downloads, say around 1000 or less, and say just a couple of hundred new items one would do a Full Scan. This always searches all directories in the Download Area for new directories and new files.
But if there are many Categories or many Downloads already in jDownloads or you are adding a large number of directories and files then dependant upon your server the process may run out of the current PHP execution time limit.
Selecting in turn the options 'Search only for new directories' and 'Search only for new files' reduces the possibilty of exceeding the execution time limit.
Restricting the Search
To assist when there are a large number of entries to be checked there are two options in the Monitoring setup, 'Monitor all File Types' and 'Monitor All Folders', that will respectively restrict the file types that are consider for Downloads and selecting those directories that are to be either included or excluded in the monitoring.
This limiting of the search path only applies to the 'Full Scan', the 'Search only for new directories' and the 'Search only for new files' settings.
The other two monitoring choices which Check for existence always search all directories.
The monitoring report will give you a reminder that a selective search region has been set as illustrated opposite with the " Not all! Selective search is set " messages.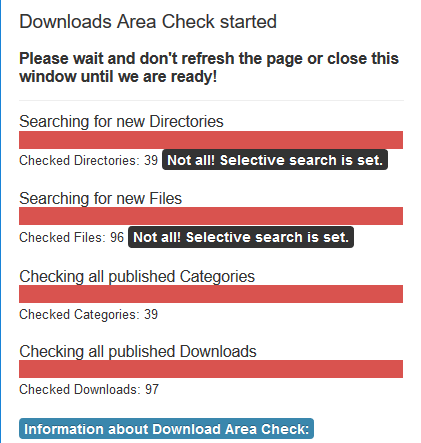
The message shown was when using a Full Scan. For very large sites then a suitable scheme might be to do the 'Search only for new directories' and, if successful, follow by 'Search only for new files'.
Configuring the Monitoring Options - General
Configuring jDownloads is by clicking on the button in the component. This is usually at the top right of the main panels.
The Monitoring Tab options may be considered in three sections.
1. Those options relating to the use of the
2. Options providing default descriptions for Categories and Downloads.
3. Other options.
Use Test Run First
The first option in this section is 'Use Test Run'. The default value is Yes.
This setting is particularly useful as it allows checking of errors and how many new files and directories have already been created as Downloads and Categories, and how many of each type are to be added.
In this example a file was deleted manually. So when actioning the 'Check Downloads Area' it gives a 'Problem Found! Please check the result!' message.
In this case the Download was invalid so the message below appeared.
Download not found: pdf files-2/TestUpload.pdf
It allows any errors to be determined before committing to make the folders and files into Categories and Downloads.
If 'Use Test Run' is set to No then Categories and Downloads will be created without the precheck.
It allows any errors to be determined before committing to make the folders and files into Categories and Downloads.
If it is set to No then Categories and Downloads will be created without the precheck.
If it is set to No then Categories and Downloads will be created without the precheck.
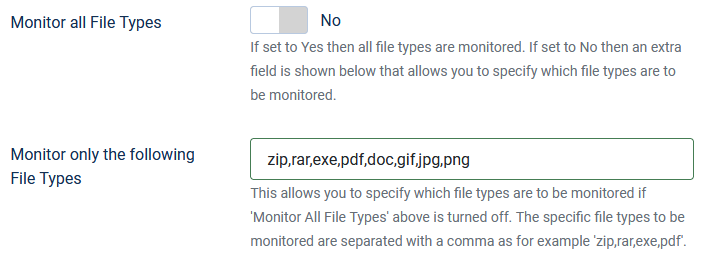
Monitor all file types
The default setting for option 'Monitor all File Types' is Yes.
When set to No then the option 'Monitor only the following File Types' appears as illustrated opposite.
Enter the required types as a comma separated list.
.
When set to No then the option 'Monitor only the following File Types' appears as illustrated opposite.
Enter the required types as a comma separated list.
.
Before starting you may wish to change the relevant options so click on the Change Options Button. These are described below in the monitoring options.
Dependant on the settings then a test run is carried out so that one can see if there are any problems. Once activated a new panel opens and shows the progress. On completion the view is like the picture on the right, which was for a 'Full Scan'.
Dependant on the settings then a test run is carried out so that one can see if there are any problems. Once activated a new panel opens and shows the progress. On completion the view is like the picture on the right, which was for a 'Full Scan'.
Automatic Publishing
The option 'Automatically Publish new found items' has a default setting of No.
Personally I always set this option to 'Yes' as then the monitor will automatically Publish any new Category or Download found during the monitoring when making changes permanent. Leaving at No means that any newly found category or Download will be unpublished.

Personally I always set this option to 'Yes' as then the monitor will automatically Publish any new Category or Download found during the monitoring when making changes permanent. Leaving at No means that any newly found category or Download will be unpublished.
Monitor all Folders
The Default setting for option 'Monitor All Folders' is Yes but when set to No then two additional options are shown which are useful when dealing with large amounts of data.
The first of these options is 'Exclude or Include'. It allows either Excluding or Including the specified Folders and any Files in those folders from the monitoring.
The second option,'Folders List', shows the list of Folders that are to be included or excluded. Each specified folder in the 'chain' must be given on a separate line.
Because this may be a little complex initially, an extended example is given.
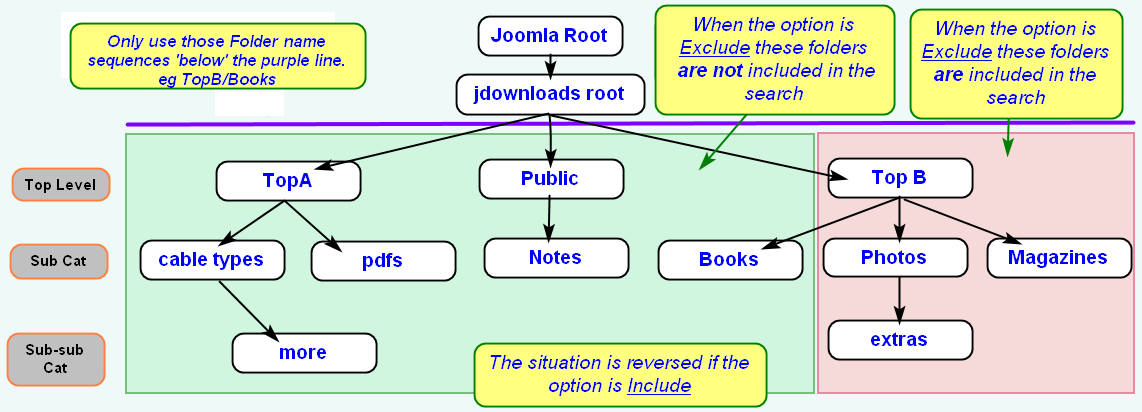
In this example as shown opposite the first two lines of the option 'Folders List' correspond to the top level categories Public Downloads and Documentation.
The third line refers to a first level subcategory of 'Test Dir' called 'New Test'.
The 'Public Downloads' and 'Sam-Cat' categories and all their subcategories, and also subcategory 'Test Dir/New Test' and all its subcategories, would be excluded from being checked for new folders and files.
It would however include category 'Test Dir' and all its subcategories except those in subcategory 'New Test' and any of is subcategories.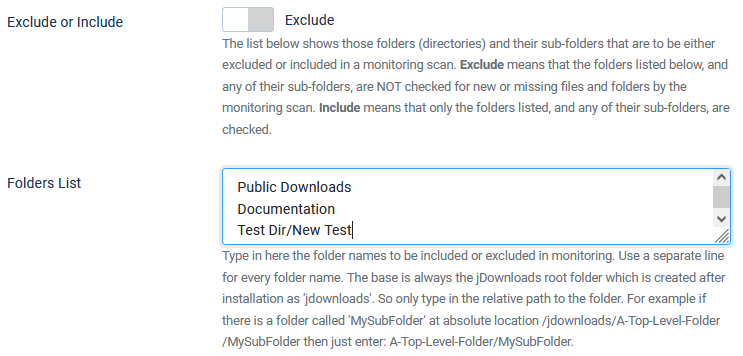
This Exclude example is illustrated in more detail below. With the 'Exclude or Include' option set to  the 'green' zone is excluded and the 'red' zone is included in the search. If instead the 'Exclude or Include' option had been set to
  the situation is reversed.
Recall that the include and exclude options apply to the contents of the folders and any sub folders and files in them.
Note Do not include the Joomla! root or the base of the Downloads area in the list.
Recall that the include and exclude options apply to the contents of the folders and any sub folders and files in them.
Note Do not include the Joomla! root or the base of the Downloads area in the list.
Download Area not working
If the server has the Gzip faciity enabled on your server then instances have occured that the Check Download Area fails to work.
For Reference Gzip compresses code on the server and then the Browser decompresses the file. Typically used for large blocks of code. Requires setting up the browser which is not straighforward. Setting up the server part seems straight forward.
Also check that the zlib.output_compression function in your cPanel is deactivated as this is also known to 'disrupt' the Check Download Area. This is sometimes in a Cpanel function 'Optimize WebSite' or similar. This compresses all content. It has an option of 'Disabled' which should be used.
Configuring - Extra Settings
Overview
This section allows uploading new Categories and Download with specific settings.
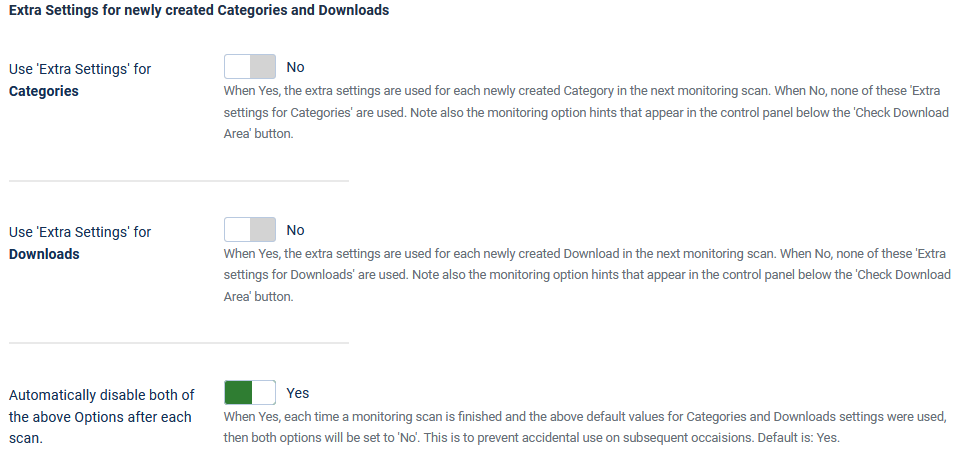
The Extra settings for Categories and for Downloads are activated by setting the relevant Option to Yes. These are looked at in more detail below.
The 'Automatically disable both of the above Options after each scan' is a special option, it does as it name suggests. That is after a Scan both of the 'Extra Settings' options will be turned off automatically by setting them to No.
This does not apply to a Test Run scan, only to scans that make changes permanent. This could be an scan initiated by a 'cron' automatic scan.
Extra settings for Categories
There are several available extra options for categories.
Most of the options use pull down lists to select the available possibilities.
That is, apart from the description, you cannot specify something that has not been setup previously.
A special mention is made for Tags. Specifically you cannot type in a new Tag name, you can only use existing tags.
Note that these settings will apply to the next monitoring scan that actually creates new categories. This could be a 'cron' automonitoring scan.
An example from the backend showing an existing category (yellow folder) and two categories (blue folders)added using the Extra Categories option.
Extra settings for Downloads
The extra setting for Dowloads are very similar to those available with Categories.
Again most options are specified by using a pull down.
The Decription and Price options are specified directly.
Note in particular these settings will apply to all of the Downloads created in the next monitoring scan, so be careful with the Price option!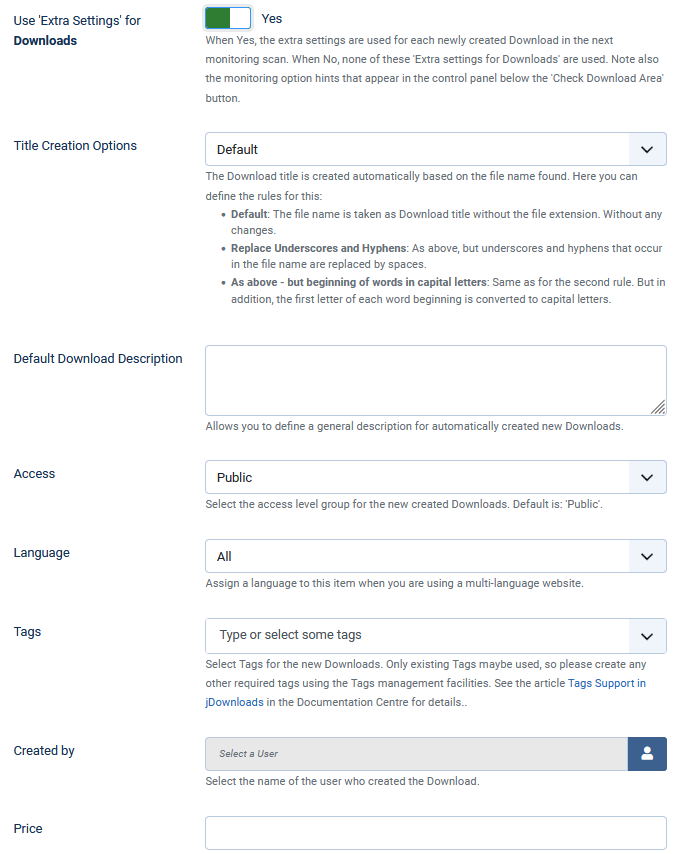
Again most options are specified by using a pull down.
The Decription and Price options are specified directly.
Note in particular these settings will apply to all of the Downloads created in the next monitoring scan, so be careful with the Price option!
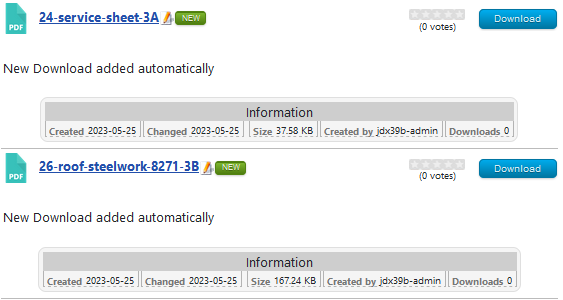
Example from the frontend of some new downloads added using the Extra Downloads option.
The Description option was set to 'New Download added automatically'. So it appears in both Downloads.
Configuring - Other Options
Optimise Server Settings
The default setting for option 'Optimise Server Settings' is Yes.
When Yes, jDownloads will try to optimise relevant server limits for the monitoring script to prevent timeouts.
However in some situations it is useful to leave the server limits at their own values.
When Yes, jDownloads will try to optimise relevant server limits for the monitoring script to prevent timeouts.
However in some situations it is useful to leave the server limits at their own values.
View additional info
The default setting for option 'View additional Information' is No.
When set to Yes relevant web server settings in the active php.ini file are shown in the  Tab on the jDownloads Control Panel.
The set shown opposite as an example are from an XAMPP test site. The Maximum input and execution time are probably much higher that those used on a web based site.
The set shown opposite as an example are from an XAMPP test site. The Maximum input and execution time are probably much higher that those used on a web based site.
Log file size
The option 'Maximum Monitoring Log File Size' is the the maximum size in kB of the Monitoring Log file. When the maximum size is reached the 'oldest' entries are removed to make sufficient space for the next entry. Default: 32 - that is 32kB.
Colin Mercer February 2019, Updated August 2020, May 2023,July 2023