Create a Category in Backend -Jul 2023
Introduction
This article and its companion on creating a Download are intended for first time users.
Categories are organised like directories in which jDownloads will save Downloads. Categories may have subcategories, sub-subcategories and so on just like a regular directory structure.
Categories are only created in the backend. They cannot, by design, be created in the frontend. There are facilities that create a category structure in an 'automated' manner. These are discused in other articles.
This article describes creating a jD Category in the backend jDownloads in a completly new install of jDownloads
New Joomla Installation
When installing jDownloads for the first time then a category named 'Uncategorised' is automatically created.
In Joomla! what a user may do is controlled by the Permissions.
The permissions system is designed so that Permissions set in a top level category will flow down the chain of any subcategories and onto any Downloads.
Also during installation jDownloads will have set the 'Download Permission' to Allowed for the Public user group in what are referred to as the 'Component Permissions'. The effect of this is that when you create Downloads they will be available to be downloaded by any user without logging in.
Much more sophisticated arrangements of the permissions and user-groups is availble to match special requirements where some Downloads may be only downloadable by specific groups of users. These are described in other articles. See for example Initial View of Permissions (opens in a new window/tab).
Select the jDownloads Component
After logging into your Joomla! as an administrator, you are taken to the Joomla! Control Panel.
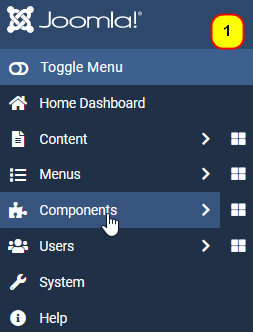
Next select the Components pulldown as indicated in image 1 on the right.
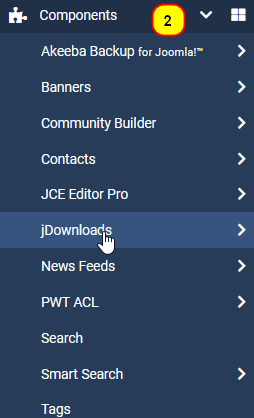
This lists all the installed components.as shown in image 2 on the right.
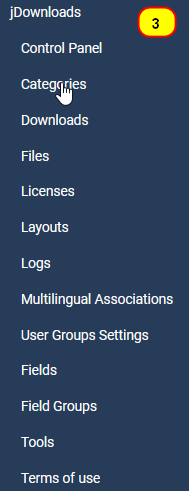
Clicking on jDownloads as indicated in image 2 gives the list of jDownloads 'functions' as shown in image 3 on the far right.
So now click on catrgories as indicated


Creating a New Category
When jDownloads is installed it automatically creates a category called 'Uncategorised'.
So as indicated click on the button to initiate creating a Category.
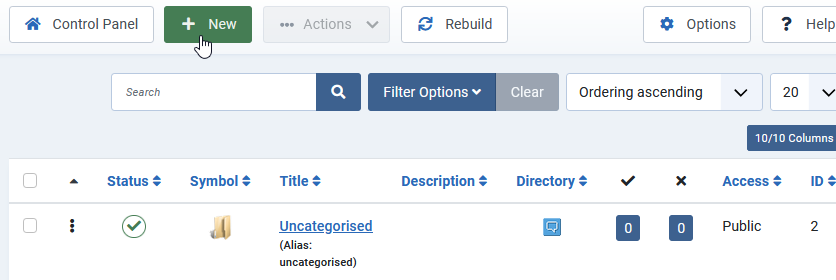
So as indicated click on the

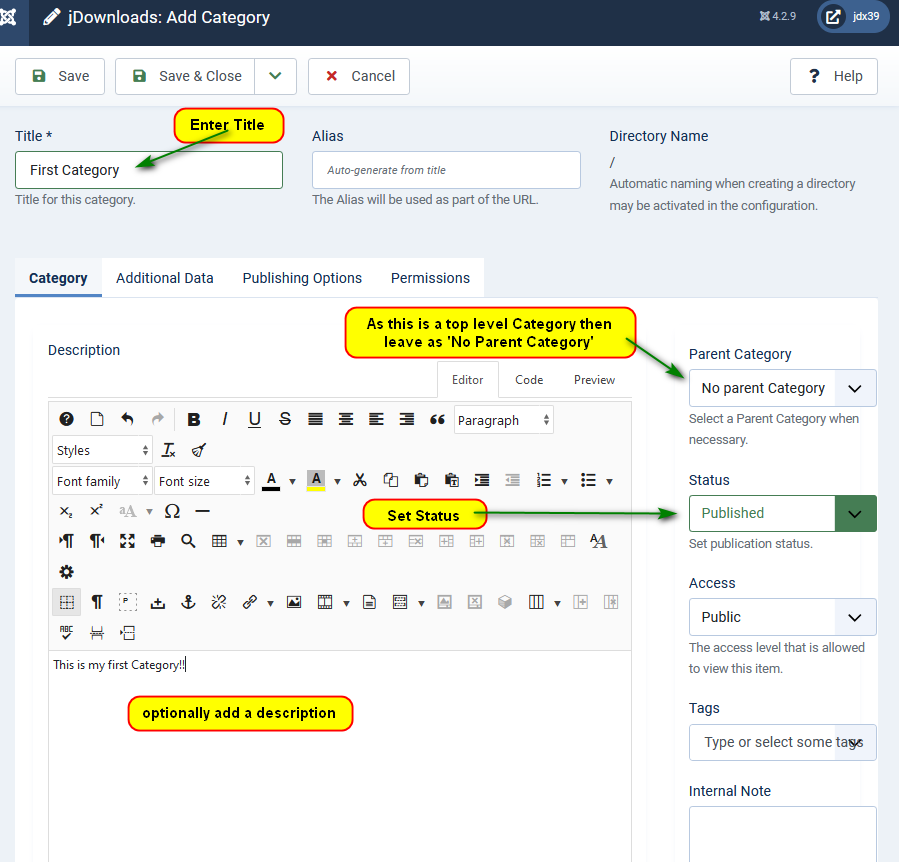
This will now show the Add Category form.
Note that because this is the 'first' user created Category it will be a 'top level' Category
Ensure you have set option 'Parent Category' as 'No parent Category'.Enter a Title which is this example is called 'First Category'.
Whilst not essential it may help if you add a description.
Also ensure that you set the Status as Published.
There are three other tabs 'Additional Data', 'Publishing Options' and 'Permissions' which provide many other facilities but these are not necessary in this basic example.
When all is done, click on the button.
Note that because this is the 'first' user created Category it will be a 'top level' Category
Ensure you have set option 'Parent Category' as 'No parent Category'.Enter a Title which is this example is called 'First Category'.
Whilst not essential it may help if you add a description.
Also ensure that you set the Status as Published.
There are three other tabs 'Additional Data', 'Publishing Options' and 'Permissions' which provide many other facilities but these are not necessary in this basic example.
When all is done, click on the

To see the list of Categories click on the button. This will give a view as shown opposite.
To edit a Category click on the Title as indicated.

To edit a Category click on the Title as indicated.

Create a sub-category
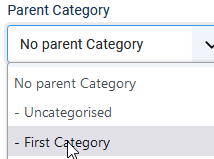
Creating a sub-category is the same as creating a top level category as above except in the Parent Categorory use the pull down box to select the parent category.
After creating the sub-category the Category list would appear like the image on the far right.
You can have a sub category of an existing sub-category to make a sub-sub-category, and so on to any depth you may choose just like a regular filing system!
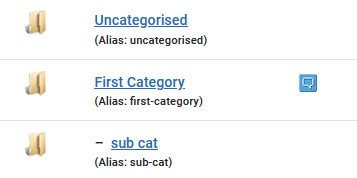
After creating the sub-category the Category list would appear like the image on the far right.
You can have a sub category of an existing sub-category to make a sub-sub-category, and so on to any depth you may choose just like a regular filing system!


ColinM, April 2022, modified April 2023, July 2023
 ownloads Documentation Centre!